Configuration
Configure a schedule’s shifts and assignment preferences with configuration templates.
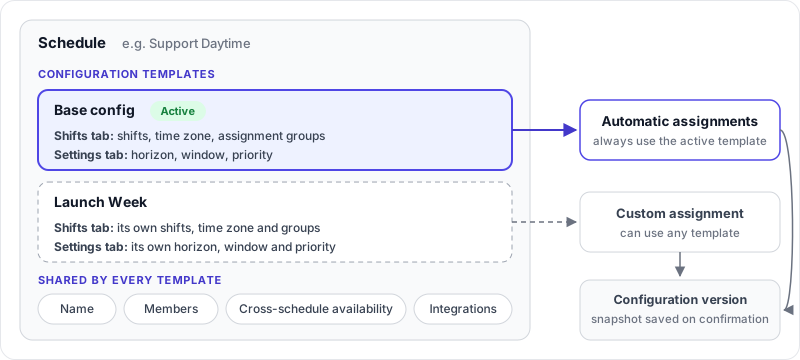
A schedule’s shifts and assignment preferences live in configuration templates. Every schedule has at least one template, and exactly one template is active: it drives every scheduled assignment. Add more templates to prepare a different pattern in advance, such as a launch week, and switch to it with one click.
A few settings belong to the schedule itself and are shared by every template: its name, members, cross-schedule availability and integrations.
How templates work
Configuration template
A configuration template is a named set of settings used to create future assignments for the schedule. Each template has its own:
- shifts, time zone and assignment groups, on its Shifts tab;
- assignment preferences (horizon, window, priority), on its Settings tab.
Members are not part of a template. They are shared by every template on the schedule.
Active template
One template on each schedule is always active. It is used for all scheduled assignments. Other templates are used only when you choose one for a custom assignment, or after you activate it.
Base config
A new schedule starts with one active template, created by the schedule setup flow (Create new schedule) and
usually named Base config. You can edit or rename it, or replace it with other templates.
Configuration version
When an assignment is confirmed, On-Call Optimizer saves a read-only snapshot of the template settings that created it. This snapshot is a configuration version.
Configuration versions are numbered in the order they are confirmed. Unchanged configurations are not duplicated: two assignments confirmed in a row from the same, unchanged template share one version.
Version ordering
The Configuration tab
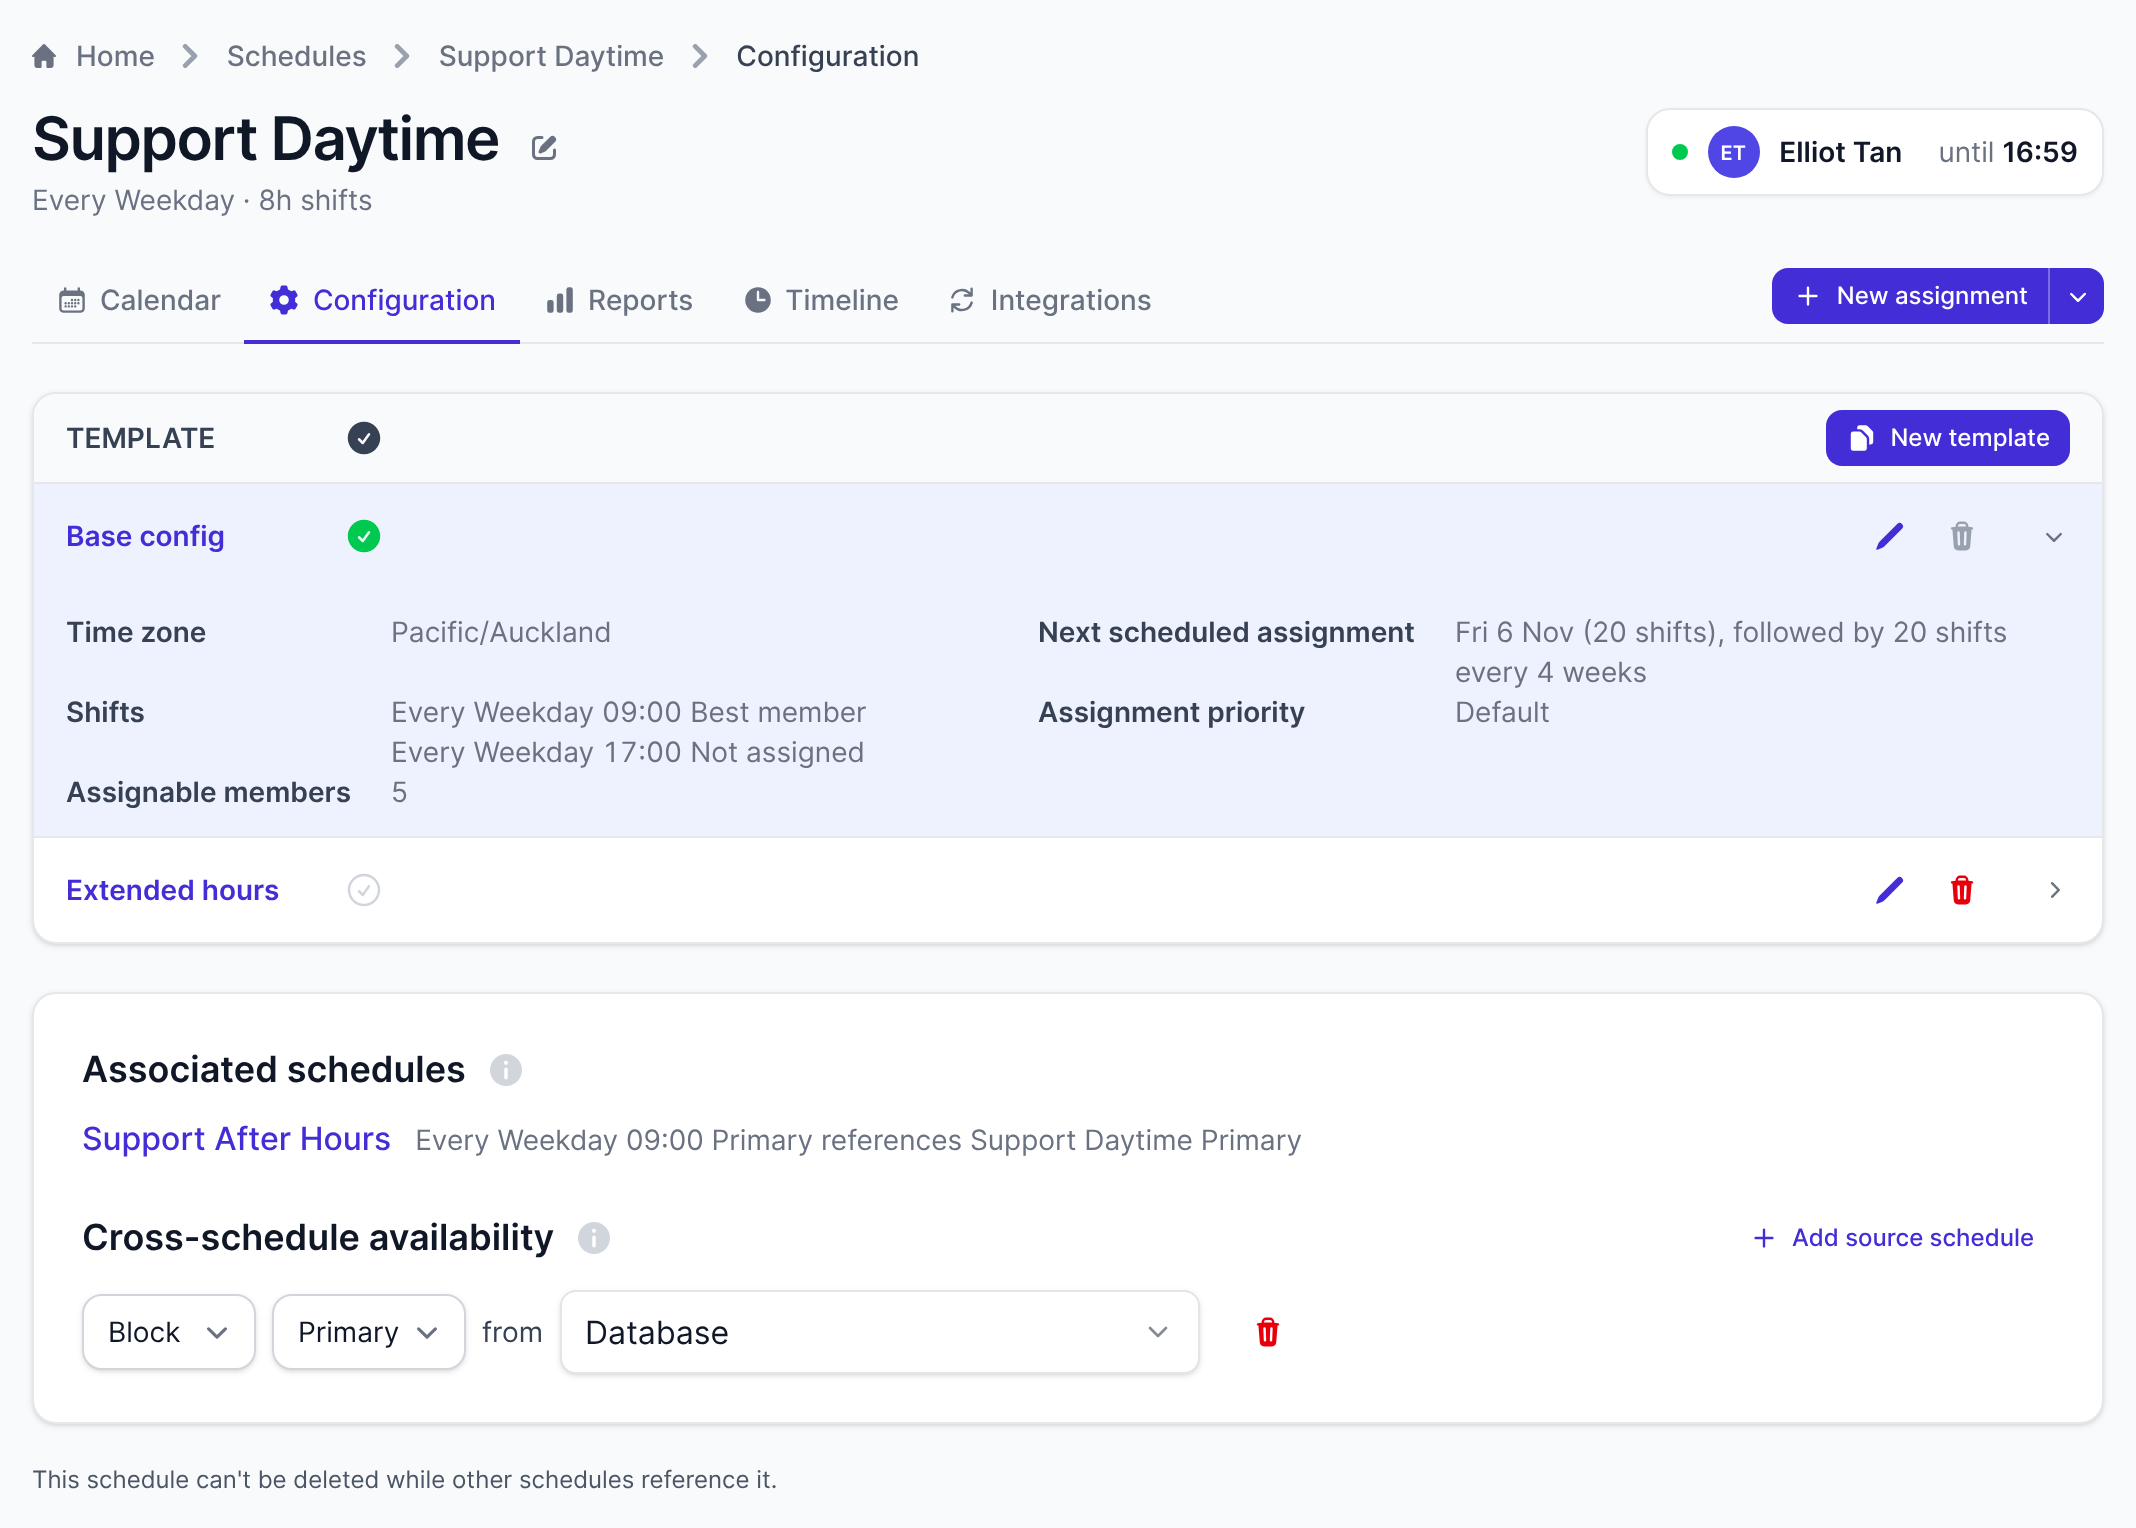
Open Schedules → schedule → Configuration tab. The tab shows:
- The templates table. The Active? column has a check mark for the active template, whose row is highlighted and expanded to show its key details (time zone, next scheduled assignment, shifts, assignment priority, assignable members). Click the arrow at the end of any row to show or hide its details, or click the row to open the template.
- Below the table, a card for this schedule’s relationships with other schedules: Cross-schedule availability and Associated schedules.
- At the foot of the page, the link to delete the schedule, or a note saying why it can’t be deleted yet, as in the example below.
Working with templates
The template page
Click a template in the templates table to open it. The page header shows the template’s name with a Template badge, plus an Active badge for the active template. The arrow at the start of the tab row takes you back to the templates list.
The template has three tabs. Each shows the settings read-only. To change them, click Edit at the end of the tab row, make your changes, then click Save (or Cancel).
| Tab | What it holds |
|---|---|
| Shifts | Description, time zone, the shifts and their assignees, and assignment groups. See Shifts tab. |
| Members | The schedule’s members, their roles, and per-member assignment options. Members are shared by every template, so changes here apply to all of them. See Members. |
| Settings | Assignment preferences: horizon, window, priority and, where enabled, distribution and hour limits. See Settings tab. |
Create a new configuration template
A new template is a copy of the active template.
- Open the schedule’s Configuration tab.
- Click New template () in the header of the templates table.
- The new, inactive template opens for editing. Change its description and settings as needed.
- Click Save.
Change the active configuration template
To choose which template is used for future scheduled assignments:
- Open the schedule’s Configuration tab.
- Find the template’s row.
- In the Active? column, click the grey check circle (), titled Activate. It turns green when you point at it.
The template becomes active straight away. Shifts that are already assigned don’t change.
Delete a configuration template
- Open the schedule’s Configuration tab.
- Find the template’s row and click the trash icon () at the end of it. You can also open the template and click Delete it. under its Shifts tab.
- In the Delete template dialog, click Delete template.
You can’t delete the active template. Activate another template first.
Use a template for one assignment
To try a template without activating it, create a custom assignment with New assignment and choose it in Config template. A draft assignment can also be switched to another template with Change template, which regenerates it and discards any customizations.
Shifts tab
The template’s Shifts tab describes how On-Call Optimizer creates future shifts. It holds the template’s Description, its Time zone, the shifts, and the assignment groups.
A template can have up to 10 shifts. Click Edit, change the grid, then click Save. Use Add shift to add a row and the trash icon to remove one.
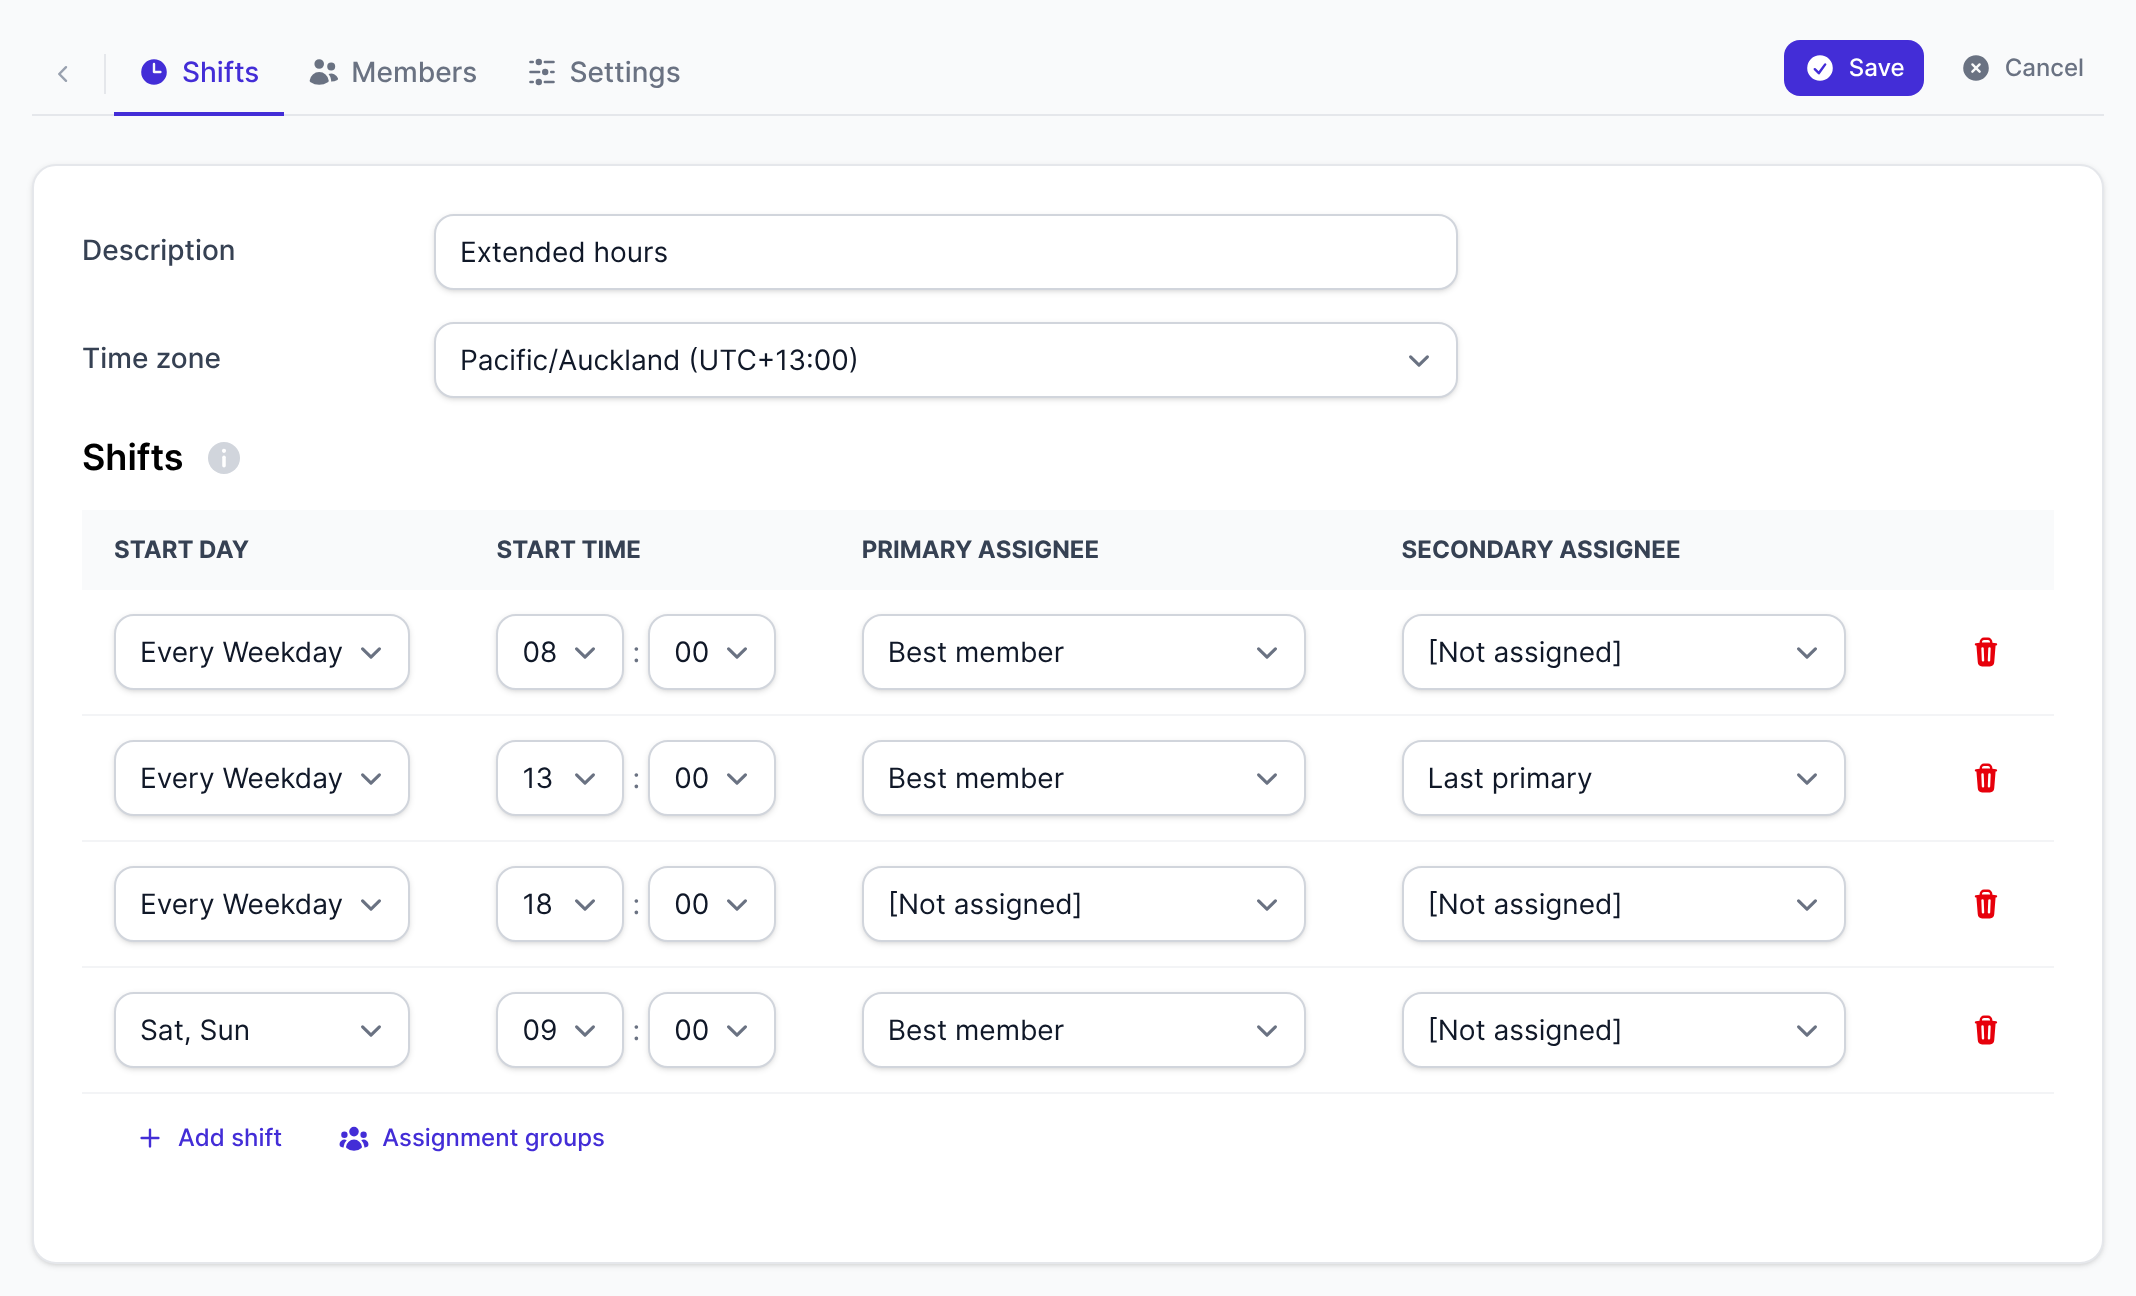
Each shift has these fields:
- Start day: Required. Daily, Every Weekday (Monday to Friday), Sat, Sun, or one day of the week (Mon-Sun).
- Start time: Required. Hour (00-23) and minute (00-59), in the template’s time zone.
- Primary assignee: Optional, but at least one shift must have an assignee.
- Secondary assignee: Optional.
A shift runs from its start time until the next shift starts.
The assignee fields accept:
- An assignable member of the schedule. This creates a static assignment.
- A role in another schedule, shown as “Schedule (Primary)” or “Schedule (Secondary)”. This creates a nested assignment.
- One of these directives:
- Best member: assign automatically from all assignable members of the
schedule. (The example configs call this
BEST_MEMBER.) - Best member from group: assign automatically from the members of one assignment group only.
- Last primary: assign the member who had the primary role in the previous shift.
- Last secondary: assign the member who had the secondary role in the previous shift.
- [Not assigned]: assign no one to this role in this shift.
- Best member: assign automatically from all assignable members of the
schedule. (The example configs call this
[Not assigned] is usually used for the secondary assignee when a shift needs only one person. You can also use it for the primary assignee to leave gaps in the schedule, for example to cover only business hours on weekdays. At least one shift must have an assignee.
The example configs show how to combine shifts for common schedule types. For the details, see the extension logic and assignment optimization reference.
Assignment groups
Assignment groups limit who can be assigned to a shift to a subset of the schedule’s members.
To manage them, open the template’s Shifts tab, click Edit, then click Assignment groups (beside Add shift). The groups open in a side panel, each with its members. Click Done to close it.
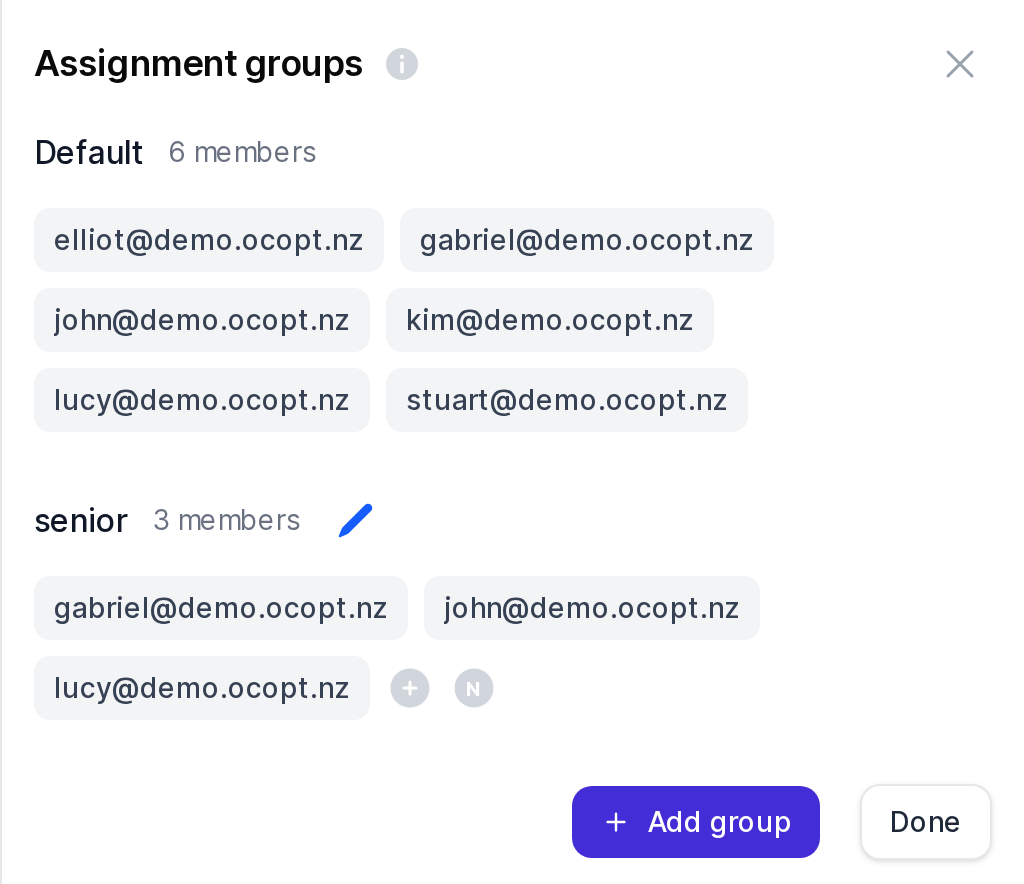
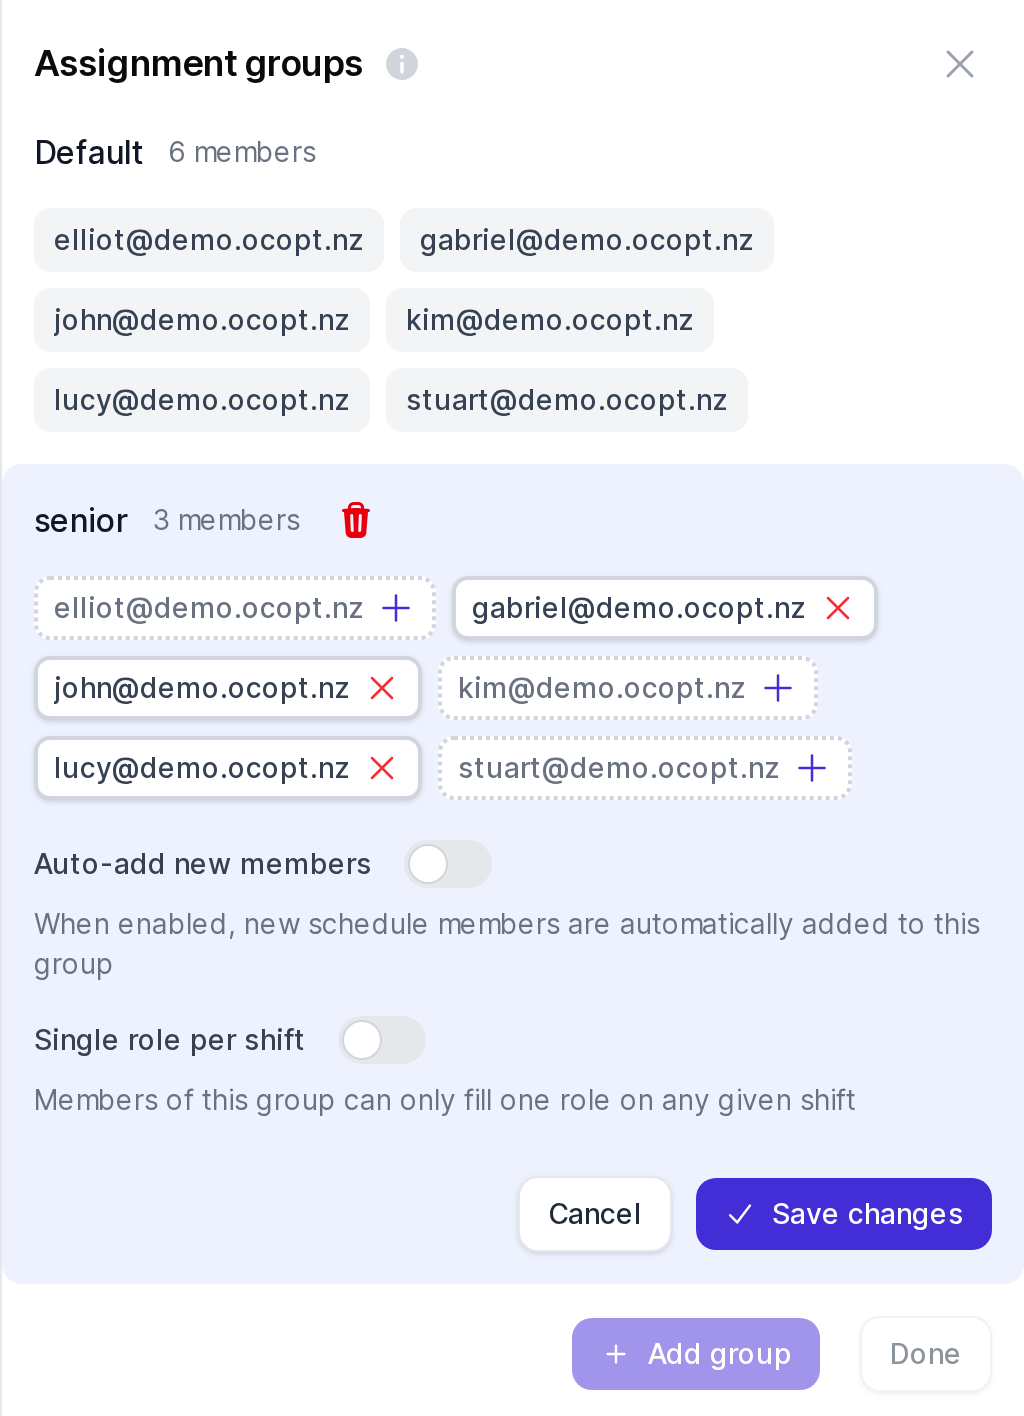
Every schedule has a group called Default that always contains all of the schedule’s assignable members. You can’t change or delete it. The Best member directive assigns from this group.
- In the Assignment groups panel, click Add group.
- Enter a Name. It must start with a letter and contain only lowercase letters, numbers and underscores.
- Choose the options:
- Auto-add new members: on by default. The group starts with all assignable members, and new schedule members join it automatically. Turn it off to start with an empty group and add members by hand.
- Single role per shift: members of this group can fill only one role (primary or secondary) in any shift.
- Click Add group.
- If you turned off Auto-add new members, click the group’s pencil icon to choose its members.
To choose a group’s members or change its options, click the pencil icon beside the group’s name. Click a member to add them to the group (+) or remove them (x), change the toggles, then click Save changes. To delete the group, click the trash icon (Delete group) beside its name while editing, and confirm.
A group that is used by at least one shift can’t be deleted and must have at least one member.
Use a group in a shift by choosing Best member from group as the assignee.
Settings tab
The template’s Settings tab holds its Assignment preferences. They control how often the schedule is assigned and what the optimizer cares most about.
To change them: open the template, click the Settings tab, click Edit, change the fields, then click Save.
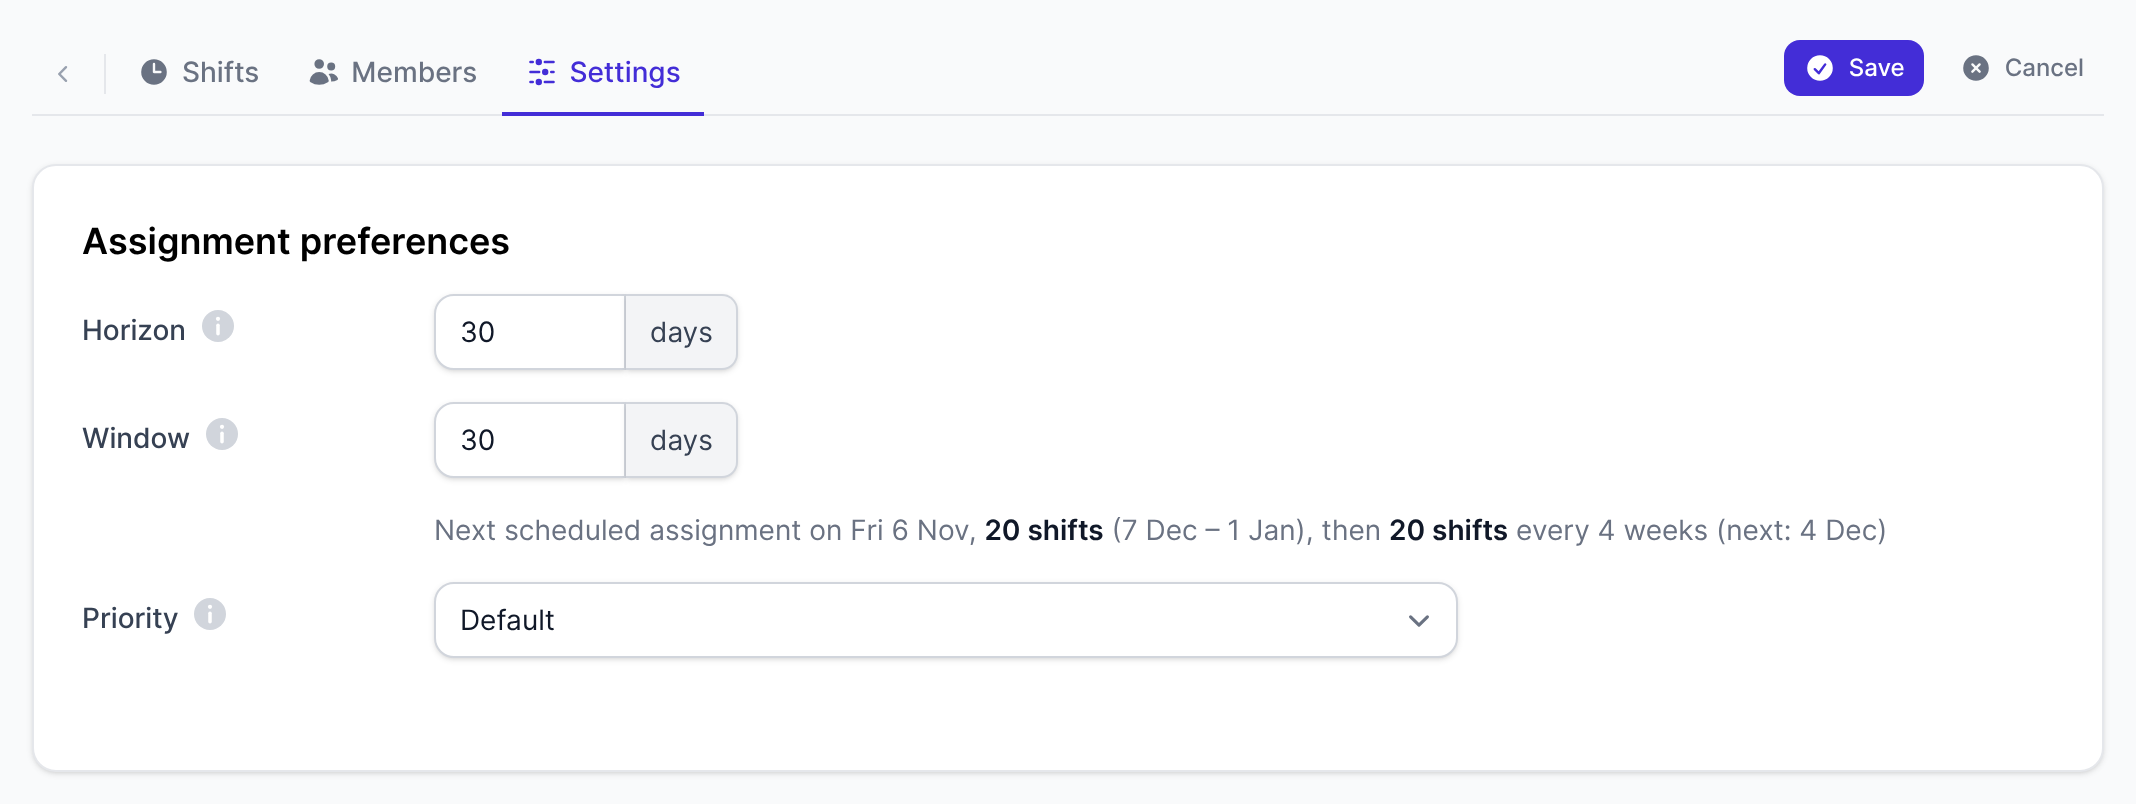
- Horizon: how far ahead, in days, shifts are kept assigned. When the end of the last assigned shift comes within this many days, the next scheduled assignment runs. See Horizon.
- Window: how many days of shifts each new assignment covers. It is also the default length of a new custom assignment.
- Priority: which optimization rules matter most, for example balance, shift spacing or member availability. Choose a preset, or Custom to set the weight of each rule with sliders (0 = ignored, 1 = default, 2-10 = increasing importance). See Priority presets.
- Distribution: Spread out across rotation (the default) spaces each member’s shifts as far apart as possible; Cluster groups them into blocks. Turn on allow member overrides to let members choose their own preference on the Members tab. See Shift distribution.
- Hour limits: caps on how many hours a member can be on call in a rolling period, written as “up to Xh in any Yh period”. Click Add hour limit to add one (up to 10), or the trash icon to remove one. See Hour limits.
Distribution and Hour limits are only shown where shift distribution is enabled for your schedule.
Under Horizon and Window, a sentence shows what these values give, for example “Next scheduled assignment on Wed 14 Oct, 30 shifts (14 Nov – 13 Dec), then 30 shifts every 30 days”. For a template that isn’t active, it starts “Would assign …”, because that template doesn’t assign anything until you activate it. Before a new schedule’s first assignment, a note shows when that assignment will run.
The first shift date is set when the schedule is created, in the setup’s Final settings step. It can’t be changed on this tab.
Horizon and window sizing
- Keep the window above about 20 days, so each assignment has enough shifts to optimize over.
- Don’t make the window too large either. Members need to have their availability in their calendars for the whole period being assigned.
- The default is 30 days for both. This gives members at least a month’s notice of each shift. The schedule’s horizon then follows a sawtooth: about 60 days just after each assignment, falling to 30 days before the next one.
- You can lower the horizon as far as your team is comfortable with. It doesn’t affect assignment quality; members just get less notice of their shifts.
The horizon and window together can’t be more than 90 days.
Schedule settings
These settings belong to the schedule and apply whichever template is active.
Name
To rename a schedule, click the pencil icon (Rename schedule) beside the schedule’s name at the top of any schedule page, enter the new Schedule name and click Rename.
The time zone is part of each template. See Shifts tab.
Members
Members are shared by all templates of a schedule. You manage them on any template’s Members tab. See Members.
Cross-schedule availability
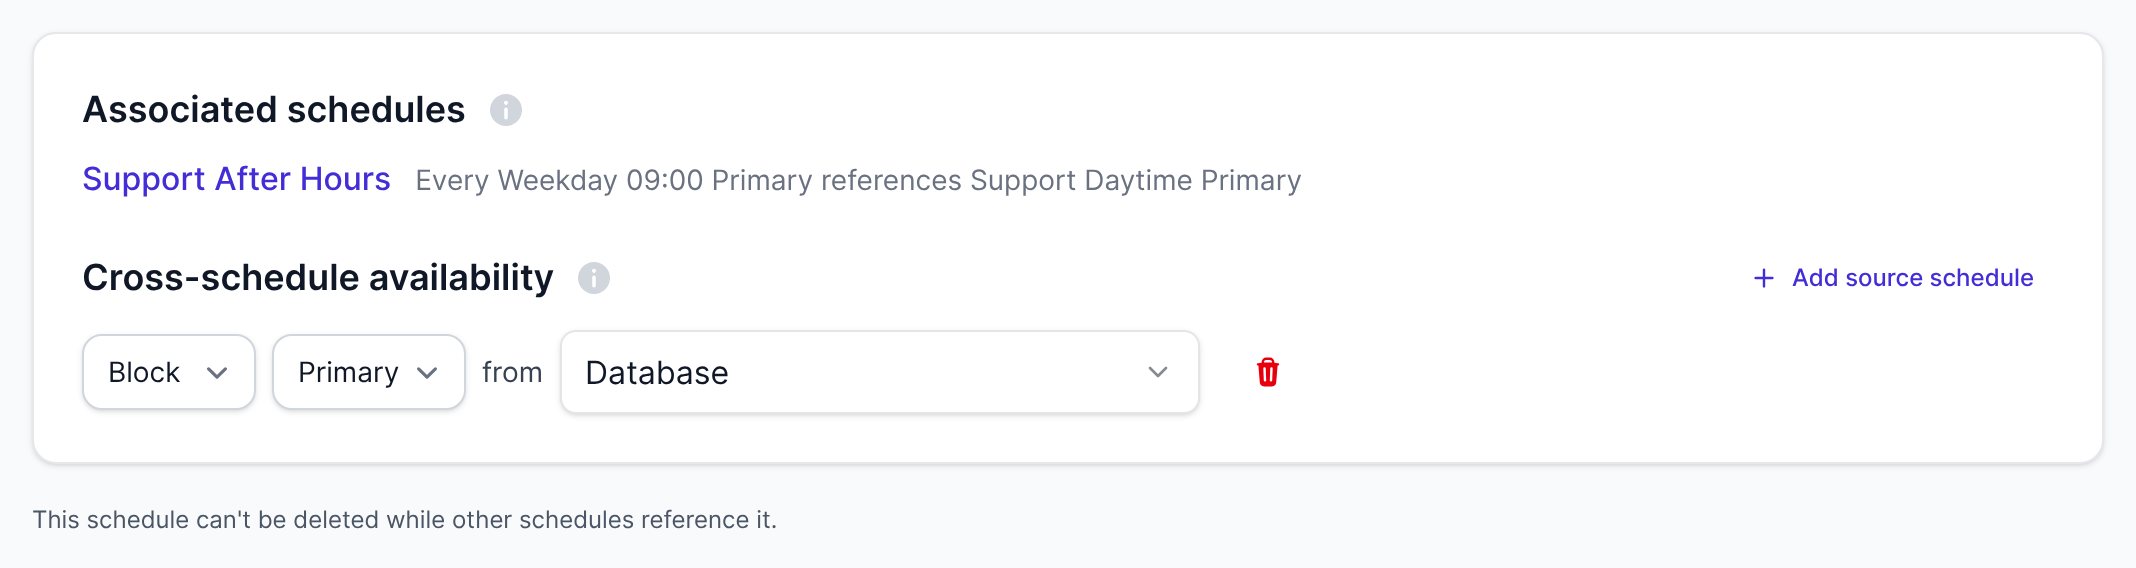
Cross-schedule availability automatically creates availability information for this schedule from the assignments in another schedule. For example, you can block anyone who is on call for a second schedule from being assigned here at the same time.
This availability information has the same weight as availability that members share from their calendars.
To add a source schedule:
- Open Schedules → schedule → Configuration tab.
- In the Cross-schedule availability card, click Add source schedule. If the card is empty, click Add cross-schedule availability instead.
- Set the three fields of the new row:
- Action: the type of availability to create, Block or Prefer.
- Role: which assignee of the source schedule to use, Primary or, when the source schedule has a secondary assignee, Secondary.
- from: the source schedule. This can be another On-Call Optimizer schedule, or a schedule in a connected on-call product, listed as “Product: schedule” (for example “PagerDuty: Platform Escalation”).
Changes save automatically. A green tick shows beside the row when it is saved. To remove a source, click the trash icon on its row and confirm Remove.
A source schedule must be assigned before the schedule that depends on it. If the source has no assignments covering the dates of a new assignment, the assignment fails because the availability it needs doesn’t exist yet. Check that the source schedule’s horizon and window keep it assigned further ahead than this schedule. The source’s window can’t be shorter than this schedule’s window. If it is, the row shows an error, for example “Source (Database) cannot have a shorter window (7 days) than this schedule (30 days)”, and isn’t saved.
Associated schedules
When other schedules reference a role on this schedule, the Associated schedules card on the Configuration tab lists them. Each entry says which of their shifts references which role here, for example “Every Weekday 09:00 Primary references Support Daytime Primary”. A schedule that referenced this one only in an earlier template is tagged earlier template only.
Whoever is assigned the referenced role here also takes the matching shift in the associated schedule. A schedule can’t be deleted while other schedules reference it.
Integrations
Exports to on-call products and the schedule’s calendar feed are set up on the schedule’s Integrations tab. See Destinations and ICS feeds.
Deleting a schedule
- At the foot of the Configuration tab, click permanently delete.
- Read the Delete schedule page. When you delete a schedule, all members lose access, no further shifts are assigned, and all its destinations are removed.
- Type the schedule’s name to confirm, then click Delete schedule.
Deletion can’t be undone. Only schedule admins and organization admins can delete a schedule; other users see the link disabled. While other schedules reference this one, the link is replaced by “This schedule can’t be deleted while other schedules reference it.”